About Mane Adige

My photo
"Mane Adige" means "Home Food" in kannada and this blog is all about recipes that I cook. Most of the recipes I post here will be from "Mangalooru" and "Bengalooru " regions of Karnataka,India. Rest of them are the one's which I try out by improvising the recipes got from different sources.

Friday, June 27, 2008

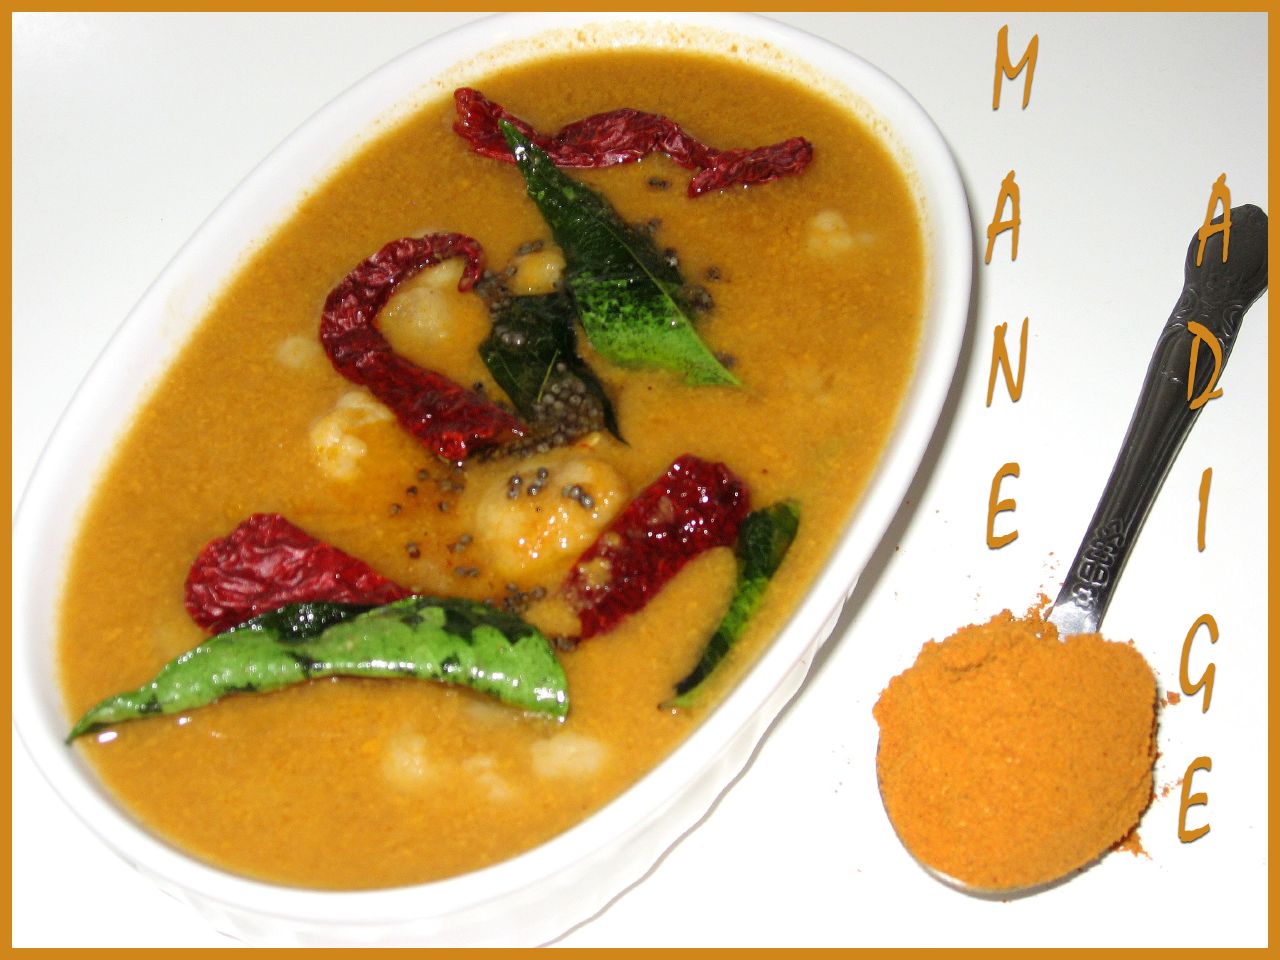
Tomato Mosaru Gojju / Tomato Pachadi

Siri from Siri's Corner and DK from Culinary Bazaar have recently come up with a brilliant event called OPEN SESAME!! There would be four boxes, each containing a surprise ingredient, out of which you pick one. A riddle corresponding to the ingredient in the box you choose, would be sent to you. You guess the ingredient and then post a recipe with that ingredient!! Points would be allotted to you depending on the number of chances/clues you take to guess the ingredient.... Lesser the chances, the better!! :) Interesting, isn't it??!?!! The riddle I got was:

"I think I am a pleased woman since I blush so much
I am so soft and shiny to your delicate touch
But look what I have for relatives, so different with no common string
one used for smoking, one for hotness, one used to refer idler and one referred as veggie's King

I am not what you refer to me most often
I am 'fruit' of labor but never called one so
I am neither a wolf nor a peach in the scale of one to ten
but then why do you think I am called one as so?

I can go green with envy, or completely red with anger
A little crown on my head makes my walk look like a swagger
You cant do without me in your day to day cooking
Tell me what veggie I am without too much thinking.
"

And the ingredient is TOMATO!!! And I got it right the very first time.. Yayyyyyyyyy!!!!!!!!!!!!! :)) Thanx Siri and DK for this wonderful event... You guys are doing a great job with the hosting and the riddles and all that stuff!!! Oh, 'n btw, voting for the Open Sesame 2 starts from July 1st and ends on July 5th. So, all you Dining Hall forum members, if you liked my recipe, please vote for me!!! I will be counting on all your votes, people!! ;))

Coming to the recipe.... As the name suggests, it is a gojju (coconut based gravy),containing mosaru (curd). Tomato Mosaru Gojju is a dish that is very similar to a couple of dishes that I had posted earlier - Kayi Huli , Beetroot Shoot Raita. Or rather, it is a combination of both the recipes. All three dishes are so very similar in ingredients, yet very different in taste!! Tomato mosaru gojju goes really well with some hot steamed rice. If you need a change from the usual rasam and sambhar... this is exactly what you are looking for!! Enjoy...

Ingredients:

3 Red, ripe tomatoes - medium sized

1/2 to 3/4 cup Grated coconut , fresh/frozen

3/4 to 1 cup curd

3-4 Green chilies, low to medium spiced

4-5 strands Cilantro

1-2 tsp Jeera

A generous pinch of hing

1 tsp Sugar (optional)

Salt as per taste

1-2 tsp Ghee/Oil

1/2 tsp Mustard seeds

1-2 Dry Red chilies, low spiced

3-4 Curry leaves

Method:

  1. Chop the tomatoes into half and cook them on stove top with very little water... Just a few teaspoons of water would also be enough.
  2. Cook for about 7-8 mins or until the skin of tomatoes peel off; Switch off the stove; Remove the skin and let cool for sometime.
  3. Meanwhile, grind coconut, cilantro, green chilies, jeera and hing to a smooth paste; Add as little water as possible. Add the cooked and cooled tomatoes to the masala paste and blend well.
  4. Transfer the mixture to a separate vessel and boil on stovetop for a few minutes; Add salt , sugar as required and mix well.
  5. Switch off the stove; Add the beaten curds and mix well. Note:Add curds ONLY after you switch off the stove. DO NOT boil after adding curds. Add water to get the desired consistency.
  6. Temper with mustard seeds, red chilies and curry leaves; Serve with hot steamed rice and enjoy!

Prep Time:About 20-30 mins.

Serves: About 3-4 people.

Tuesday, June 24, 2008

Gojjavalakki / Huli Avalakki (Crushed and Spiced Poha)

A tea time/ breakfast dish for you guys this time.... This is a very simple and easy to make dish. This one, again, gets its name from the tamarind that's added to it!! Though very easy to make, this dish needs a little bit of pre- planning. You need to give about 30-45 mins of soaking time for the poha. So, I wont call this an instant dish... But yes, it is worth the wait!! :)

Am sending this over to Sig for the JFI-Tamarind event that she is hosting this month. Thanx Sig for hosting and Thanx Indira from Mahanandi, for having come up with the wonderful JFI idea!!

Ingredients:

1 cup Thick Poha

1 tbsp Jaggery

1 tsp Tamarind paste

1-2 tsp Rasam powder (home made or readymade, any brand of your choice)

Salt as per taste

1-2 strands Cilantro, chopped finely

1-2 tsp Oil

1/2 tsp Mustard seeds

3-4 Curry leaves

1-2 tsp Peanuts

A pinch of Hing

1/2 tsp Chana-Urad Dal mixture

Method:

  1. Pulse the poha in the blender a couple of times, so that it is crushed coarsely; Make sure not to powder it too smooth; Keep aside.
  2. Mix jaggery, tamarind, salt and rasam powder in 2 cups of water and place on stove on low heat; Keep stirring until all the jaggery and salt dissolves in. Note: You do not have to really boil the water here. Mild heating should be enough. This spiced water should taste a little strong.... in the sense that, there should be a little extra of all ingredients.
  3. Pour the spiced water on the crushed poha little by little; Mix continuously. Add enough of it to make the poha damp; DO NOT add too much spiced water and make a paste out of the poha. The poha should still be separate and remain in crumbles.
  4. Cover and let soak for about 15-20 mins; If you feel the poha is too dry, ad little more of the spiced water and let soak for another 20-30 mins. The poha would have absorbed the spices well, by now.
  5. Adjust the sweetness and salt according to your taste.
  6. Heat oil in a pan and add mustard seeds; Add hing, curry leaves, peanuts and dal mixture;Once done, add to poha; Garnish with chopped cilantro and serve.

Prep Time: About 1 hr;

Serves: 1-2 people;

More Avalakki/Poha recipes on Mane Adige:

Avalakki Mixture/Chiwda

Avalakki Upkari

Monday, June 16, 2008

"Florida - The Sunshine State".... Really?!?!?!


Well yes, we were at Miami over the weekend..... It was a nice, short 'n sweet, two-day outing! Miami is a beautiful city with beautiful beaches. I was amazed by the deep blue waters of the Atlantic!! The city is full of life.....The excitement and enthusiasm is contagious!! It is indeed THE Party City!!

The drive from Miami to Key West along "US 1" was very scenic. You get to see a lot of small islands called the "FLORIDA KEYS" on the way to Key West (Key West is the farthest inhabited Florida Key) There was some construction happening on US 1 and the speed limits were low, because of which it took us a little longer than usual... But it was worth every bit! With the famous sunset at Mallory square, shopping on Duval Street and all the thrilling water sports, Key West does quality as one of the most preferred vacation destinations!!!

While it was a nice getaway from the usual grind, our trip had its share of miseries too! Let me start from Day 1.... Our flight from Chicago to Miami was on Thursday morning 9:04 AM. We were at the airport by around 7:30 AM and joined the queue for check-in luggage. It was a big queue and we got to the airways agent after a long 30 mins wait. And guess what she says?!?!!? "I'm sorry you are TWO mins late and I cannot check-in your luggage"  Can you believe that?!?! She said we could get in, if we left our stuff back!!! How could we possibly do that?!?! And it wasn't like we were very late or something... we still had an hour's time before our flight took off. But they didn't budge!!! We finally had to postpone our booking to the flight at 5:45 PM :(. We decided to come home as we still had a lot of time in hand. And guess what was waiting for us on our way back home??!?! Our car got a flat tire!!! The next few hours went in getting that fixed. We then caught the evening flight to Miami, that put us at Miami late in the night. We wake up the next morning to heavy rains and thunderstorms :((((. We had already lost more than half a day because of the "missed flight", which we hadn't actually missed... and then the rains!!! It was not until noon that we could step out of the room. The rest of the day was much better.... Small stretches of sunshine in between the dark clouds!!! And every time it got a little sunny, we hurriedly grabbed a few shots of the beach and the places around..... And due to the bad weather, the water sports were also canceled in Miami that day :(. We saw around the city a little, spent some time at the beach, dined at a place on Ocean Drive, and of course, clicked pictures whenever the weather permitted !!! :)

We were all set to drive through the Florida Keys the next day.... The weather seemed pretty good and we were all excited!! We did the glass bottom boat tour at Key Largo - Thanx to my friend Shubha for having suggested this.... It was really good!! We got to see the coral reefs without going snorkeling or scuba diving!!! We were hoping that the weather would remain the same throughout the day.... But not everything we hope for, comes true!  By the time we reached Key West, it got cloudy again. Sunset at Mallory square didn't seem anything like what I had heard or seen on the Internet :((.  There were a whole lot of people at Mallory Square, waiting for the sunset. Everyone there seemed disappointed.... But only until the street performances started happening. The other thing that Mallory  Square is famous for, is the Street performers!! Those performers were really good... exceptional, I must say, at whatever skills and tricks they performed!!   There were jugglers, sword swallowers, silver men and many more! We then strolled around Duval Street - The most happening street in Key West! It is mainly a shopping area with lot of bars and cafes too! Duval street was indeed nice!! It had this, "very sweet 'n cozy" atmosphere. The weather didn't really bother us much here... :).  Got back to Miami late that night, packed up and reached the airport well ahead of time the next morning, to catch our flight back to Chicago...... We didn't wanna take any chances this time! :)

After such an experience, we wondered..... "Florida - The Sunshine State" Really?!?!?!

In spite of all the spoil sport the weather played, we did enjoy our trip and we did have a blast!! Another set of delays due to bad weather, on our way back, and we finally managed to reach Chicago last evening. Naveen was asking me .... "After such an experience, would you like to go Miami again some other time?" I said... "Yes, absolutely!! I loved Miami. But I would never fly!!! Even if I did, I would never carry check-in luggage!!" :) All in all, an eventful vacation!!

Tuesday, June 10, 2008

Huli


In Kannada, the word "Huli" means different things in different contexts. It could mean the "sour taste"... Tamarind is also called "Huli" in certain parts of Karnataka..... "Huli" also refers to the sambhar-like coconut based gravy which is eaten with rice.


Huli- the coconut based gravy, is an indispensable part of Kannada cuisine. This coconut based gravy probably gets its name from one of its main ingredients - tamarind. Though very similar to sambhar, huli and sambhar are NOT the same in Kannada cuisine... They differ by a couple of ingredients!! But, most people use the terms interchangeably because of the similarity in looks and taste . So, go ahead and use whatever term you are comfy with!! :)


I had not posted this recipe all this while, thinking it was too common and that every household has their own version of this recipe. Its hard to generalize and come up with one standard recipe. However, a lot of people have been requesting me for this traditional "Huli" recipe for quite some time now. So, here is my version (To be read as "my mother's version" ;)....). You could use any veggie of your choice, like eggplants, cabbage, beans, cauliflower, tindora, or even a combination of veggies, like potato-onion, okra-onion, carrot-onion, eggplant-black eyed beans etc. Enjoi!!

Oh, and btw, Sig from Live to Eat is hosting this month's JFI event(brainchild of Indira from Mahanandi for the ingredient Tamarind - Jihva for Tamarind. I am sending this "Huli" over to Sig's place for her JFI event. Thanx Sig, for hosting!! :)

Suganya, of Tasty Palettes is hosting this month's A Fruit A Month event , AFAM: Coconut. Started by Maheshwari of Beyond the Usual, the AFAM event celebrates one fruit every month. Thanx Maheshwari for having come up with such a brilliant idea, and thanx Suganya for hosting this month's AFAM event. I am sending this "Huli" recipe over to Suganya's place as my entry for AFAM:Coconut!!!


Ingredients:

2 cups chopped veggies

1 cup Toor dal (thogari bele), cleaned and washed

3/4 cup Grated coconut, fresh/frozen

1 tbsp Jaggery

1/4 tsp Tamarind paste

Salt as per taste

1-2 tsp Oil/Ghee

1/2 tsp Mustard seeds

4-5 Curry leaves

1/4 tsp Hing

A pinch of turmeric

For the Masala:

2 tsp Chana Dal / Kadle Bele

4 tsp Coriander Seeds

4-5 Dry Red Chilies, low to medium spiced

1 tsp Jeera (optional)

1 tsp Methi seeds (optional)

Method:

  1. Dry roast the ingredients for the masala until the raw smell disappears; If you are new to roasting masalas, you might want to roast each of the ingredients separately to avoid over roasting them.
  2. Powder the masalas in a blender without adding any water; Add coconut and some water to the powdered masala and grind to a smooth paste; Keep aside.
  3. Add a couple of drops oil and a pinch of turmeric to the washed toor dal.... Dal is supposed to cook faster with some oil and turmeric; Add enough water to cover the toor dal and pressure cook until done... for about 3-4 whistles.
  4. Meanwhile, clean and cook veggies with some salt and water, until done; You could even combine the veggies with the dal and pressure cook them, provided, you take care not to mash the veggies.
  5. Combine the cooked dal, veggies, coconut-masala paste and mix well; Add water to get the desired consistency.
  6. Boil on medium heat for 3-4 minutes. Add salt, jaggery, tamarind and mix well; Boil further, for another 3-5 minutes and remove from stove.
  7. Temper with mustard seeds, hing and curry leaves; Serve hot with rice/idli/dosa and enjoy!

Tip:

To make the process simpler and faster, you could make the masala powder in bigger proportions and store them in air tight containers. You could then use 2-3 tsp of "Huli Pudi" (meaning, huli powder) to grind it with coconut to a smooth paste!!!


Prep Time: About 45 mins, including pressure cooking time.

Serves: About 3-4 people.

Tuesday, June 3, 2008

Appa / Yeriyappa


I was talking to a friend the other day and she noted a very valid point about my posts. "You hardly have any sweets on Mane Adige", she said. I immediately checked back, and she was right!!!! It's been a while since I posted the recipe for any sweet dish... So, here goes!!!

This dish is again Karnataka's traditional dish and is called "Appa" in Mangalore - Udupi regions and " Eriyappa or Yeriyappa" in Bangalore - Mysore regions.... It's main ingredients being rice, banana and jaggery. I used the non-stick appam pan that I got from India last time. However, you could even use the "Pancake Puffs" pan that you get in the American stores. If you have neither, you could even deep fry - make the batter a little thick and drop into the heated oil spoon by spoon.

Ingredients:

1 cup White rice, soaked in water for about 3-4 hrs

1/2 cup Grated coconut, fresh/frozen

2 Ripe Bananas, mashed

1/2 cup Jaggery

1 tbsp Sugar (optional)

1 tsp Powdered Elaichi

Method:

  1. Grind rice, coconut, jaggery and banana to a smooth paste; Make sure to add VERY LITTLE water while grinding. Add sugar, elaichi powder and mix well. Note:  Sugar is an optional ingredient. Adding some sugar gives a golden brown color to the eriyappa.
  2. Heat the appam pan on low- medium heat.
  3. Add a couple of drops on oil in each depression of the pan; Fill the depressions with the prepared batter. Cook covered on low heat - increasing the heat might burn the outer parts of the eriyappa while the inside is still uncooked.
  4. Turn eriyappa with the help  of a spoon and cook on both sides; Remove from pan and drain on paper towels; Serve hot and enjoy!!

Variation: You could even use jackfruit instead of bananas.

Prep Time: About 20-30 mins, excluding soaking time

Makes: About 15-20